Initial Setup
Cypress is a next generation front end testing tool built for the modern web, which addresses the key pain points developers and QA engineers face when testing modern applications.
To complete this tutorial, you will need an environment with Node.js >=14.17.0 available.
We start by initializing our project and installing our dependencies:
$ yarn init -y
$ yarn add -D cypress http-server viswiz
// or
$ npm init -y
$ npm install -D cypress http-server viswiz
🔌 Start our app during tests
We need to start our application's server before the tests start and stop it when they end.
For this tutorial, we're going to use a static HTML page with a few static assets, which will all be served by a minimal HTTP server using the http-server package. Depending on how your app is structured, you might have a different method of accessing it, so replace this section with your custom logic for starting and stopping your app.
So, our package.json will contain a start script:
  "scripts": {
    "start": "http-server public/"
  },
Running this command will start a HTTP server on the port 8080 serving our application's static files.
👾 Run Cypress with tests
Let's add Cypress and write our first test with it. For a more thorough guide read how to use Cypress.
Our first test will load our app in Cypress and test the main heading element.
/// <reference types="cypress" />

context('home page', () => {
    beforeEach(() => {
        cy.visit('http://localhost:8080');
    });

    it('screenshot', () => {
        cy.get('h1').should('have.length', 1).contains('ACME Banana');
    });
});
You can do a lot with the Cypress API, so feel free to implement as many functional assertions as your app functionality requires for each page.
In our package.json we'll add a test script:
"test": "cypress run --browser chrome"We can start the application server using yarn start in one terminal, and in another terminal we run yarn test to run the Cypress test:
Running:  home.test.js                                                                    (1 of 1)

home page
  ✓ screenshot (809ms)

1 passing (2s)
✨ Visual Regression Testing with VisWiz.io
To add visual regression testing with VisWiz.io into our tests, we're going to capture screenshots of our app during our tests. These screenshots should be taken at different points during the testing phase, depending on your app's requirements and business logic.
For capturing such screenshots, Cypress offers a simple API call to achieve this:
cy.screenshot('home');By default Cypress stores screenshots in the folder cypress/schreenshots, but it can be configured to use another folder.
When our tests have finished, we want to send the build information and screenshots to the VisWiz.io API. This can be achieved very easy with our CLI, by adding the following in the package.json script, which we need to call after our tests:
"test:viswiz": "viswiz build --image-dir ./cypress/screenshots/"Our CLI will try to detect the most commong CI environment variables. But in case you are using a custom CI system, you many need to send additional parameters to the viswiz build command.
For the final integration of VisWiz.io in our tests, we need to have the following environment variables available: VISWIZ_API_KEY and VISWIZ_PROJECT_ID. You can export these in your terminal shell while developing, but you will need to define these in your CI system (please refer to your CI documentation on how to define environment variables).
To get your API key and project ID, follow our Getting Started guide.
💯 Visual Regression Results
When you run the tests now, you will send the images results from your tests to our VisWiz.io service for regression testing.
Running:  home.test.js                                                                    (1 of 1)

home page
  ✓ screenshot (809ms)

1 passing (2s)

Creating build on VisWiz.io...
100% (1/1 images)
Build created successfully!
Build report will be available at: https://app.viswiz.io/projects/PROJECT_ID/build/BUILD_ID/results
Done in 1.75s.
Please note that the initial build created on VisWiz.io will not have any baseline to compare itself to, so there will be no regression report generated for it. However, all builds created after that one will generate visual regression reports like this one:
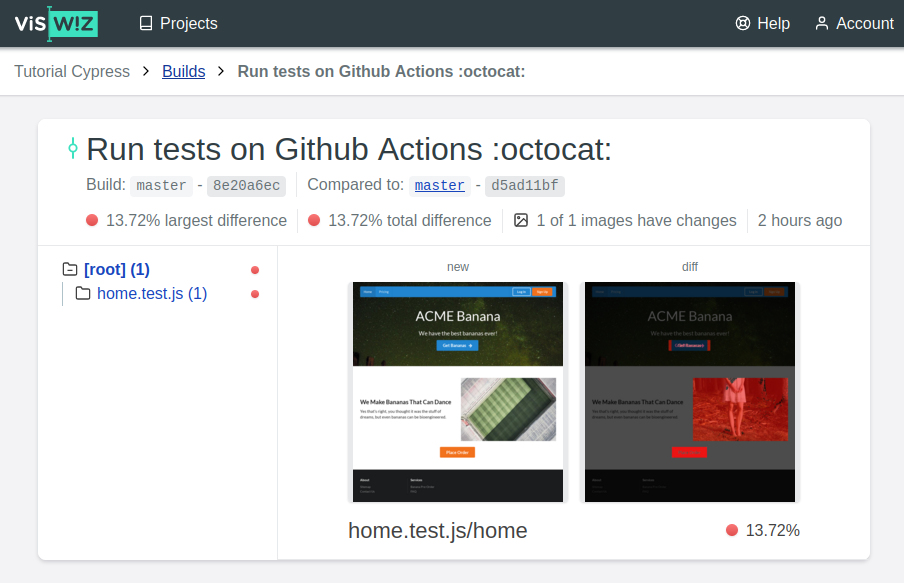
After running the tests, open your Projects page, choose your project and open your last build to see the report for it.
🚀 Final touches
Feel free to explore the Cypress introduction and API documentation to find out what else you can do with Cypress.
You can also follow this tutorial with the actual code, commit by commit, on our tutorial repository: github.com/viswiz-io/viswiz-tutorial-cypress.
Congratulations! You are now ready to start visually testing your application with Cypress and VisWiz.io! 🎉
📝 Note: This tutorial was first published in the Help section of VisWiz.io.
