
Puppeteer is a Node.js library which provides a high-level API to control headless Chrome. It is a great tool to perform browser automation tasks.
Jest is a Node.js testing framework which is fast, easy to setup and very flexible.
To complete this tutorial, you will need an environment with Node.js >= 8 available.
Initial Setup
We start by initializing our project and installing our dependencies with yarn:
$ yarn init -y
$ yarn add -D jest express puppeteer viswiz-sdk
Or, similarly with npm:
$ npm init -y
$ npm install -D jest express puppeteer viswiz-sdk
🔧 Tests configuration
Let's configure jest first. Create a jest.config.js file:
module.exports = {
    globalSetup: './tests/setup.js',
    globalTeardown: './tests/teardown.js',
    testMatch: ['**/tests/**/*-test.js'],
};
We'll use the global setup and teardown scripts to start Puppeteer and our web app server in the next steps. For now, we just create those two files and have them export an empty async function.
Let's also add a test script in package.json for convenience:
"scripts": {
    "tejest"
}
🔌 Start our app during tests
We want to start our app's server before the tests start (in the global setup script) and stop it when they end (in the global teardown script).
For this tutorial, we're going to use a static HTML page with a few static assets, which will all be served by a minimal express app. Depending on how your app is structured, you might have a different method of accessing it, so replace this section with your custom logic for starting and stopping your app.
So, our tests/setup.js will now look like this:
const express = require('express');

module.exports = async function () {
    const app = express();
    app.use(express.static('public/'));
    global.__SERVER__ = app.listen(8080);
};
And our tests/teardown.js will look like this:
module.exports = async function () {
    global.__SERVER__.close();
};
We add a simple test to validate that we can access our app when the tests run:
const http = require('http');

describe('index page', () => {
    test('loads the index page HTTP', (done) => {
        http.request({
            hostname: 'localhost',
            port: 8080,
            path: '/',
        }, (response) => {
            expect(response.statusCode).toBe(200);
            done();
        }).end();
    });
});
Running our tests now will start our express server, and the test will be able to make an HTTP request.
$ yarn test
 PASS  tests/visual/main-test.js
  index page
    ✓ loads the index page HTTP (15ms)

Test Suites: 1 passed, 1 total
👾 Run Puppeteer with tests
We made good progress so far. It's time to throw Puppeteer into the mix. We're going to follow the official documentation on how to use Jest with Puppeteer.
First, to actually start Puppeteer when our tests start, we append the following code in our tests/setup.js function:
const browser = await puppeteer.launch({});
global.__BROWSER__ = browser;
fs.writeFileSync(
    path.join(__dirname, '..', 'tmp', 'puppeteerEndpoint'),
    browser.wsEndpoint(),
);
This launches a headless instance of Chrome and keeps it available for other instructions. Of course, we need to close this instance when our tests have finished, by adding in our tests/teardown.js function:
await global.__BROWSER__.close();Afterwards, we create a custom test environment for running tests in Jest in tests/test-environment.js. This allows us to create a new Puppeteer instance and connect it to the headless Chrome started in our global setup function.
const fs = require('fs');
const JestNodeEnvironment = require('jest-environment-node');
const path = require('path');
const puppeteer = require('puppeteer');

class TestEnvironment extends JestNodeEnvironment {
    constructor(config) {
        super(config);
    }

    async setup() {
        await super.setup();

        const wsEndpoint = fs.readFileSync(
            path.join(__dirname, '..', 'tmp', 'puppeteerEndpoint'),
            'utf8',
        );
        if (!wsEndpoint) {
            throw new Error('wsEndpoint not found');
        }

        this.global.__BROWSER__ = await puppeteer.connect({
            browserWSEndpoint: wsEndpoint,
        });
    }

    async teardown() {
        await super.teardown();
    }

    runScript(script) {
        return super.runScript(script);
    }
}

module.exports = TestEnvironment;
Then, we configure jest to use this custom test environment, by adding the following in jest.config.js
testEnvironment: './tests/test-environment.js',✅ Write functional test with Puppeteer
Now it's finally time to write our first test which will load our app in Puppeteer and give us access to all of its APIs.
const path = require('path');

describe('index page', () => {
    let page;

    beforeAll(async () => {
        page = await __BROWSER__.newPage();
        await page.goto('http://localhost:8080/');
    }, 5000);

    afterAll(async () => {
        await page.close();
    });

    test('should load the index page', async () => {
        const text = await page.evaluate(() => document.body.textContent);
        expect(text).toContain('ACME Banana');
    }, 5000);
});
You can do a lot with the Puppeteer API, so feel free to implement as many functional assertions as your app functionality requires for each page.
✨ Visual Regression Testing with VisWiz.io
To add visual regression testing with VisWiz.io into our tests, we're going to capture screenshots of our app during our tests. These screenshots should be taken at different points during the testing phase, depending on your app's requirements and business logic.
For capturing such screenshots, Puppeteer offers a straightforward API call to achieve this:
await page.screenshot({
    fullPage: true,
    path: `${path.resolve(__dirname, '..', '..', 'results')}/index.png`,
});
You could make this code more DRY by creating a helper method to take these screenshots.
When our tests have finished, we want to send the build information and screenshots to the VisWiz.io API. This can be achieved very easy with our SDK, by adding the following in the tests/teardown.js function:
if (process.env.VISWIZ_API_KEY) {
    const client = new VisWiz(process.env.VISWIZ_API_KEY);
    await client.buildWithImages(
        {
            branch: process.env.TRAVIS_BRANCH || 'master',
            name: process.env.TRAVIS_COMMIT_MESSAGE || 'dev-' + new Date().toISOString(),
            projectID: process.env.VISWIZ_PROJECT_ID,
            revision: process.env.TRAVIS_COMMIT || 'dev-' + new Date().toISOString(),
        },
        path.resolve(__dirname, '..', 'results'),
    );
}
Note that the example above is using environment variables available in Travis CI. Replace those with the corresponding environment variables from your CI system.
For the final integration of VisWiz.io in our tests, we need to have the following environment variables available: VISWIZ_API_KEY and VISWIZ_PROJECT_ID. You can export these in your terminal shell while developing, but you will need to define these in your CI system (please refer to your CI documentation on how to define environment variables).
To get your API key and project ID, follow our Getting Started guide.
💯 Visual Regression Results
When you run the tests now, you will send the images results from your tests to our VisWiz.io service for regression testing.
$ yarn test
 PASS  tests/visual/index-test.js
  index page
    ✓ should load the index page (275ms)

Test Suites: 1 passed, 1 total
Please note that the initial build created on VisWiz.io will not have any baseline to compare itself to, so there will be no regression report generated for it. However, all builds created after that one will generate visual regression reports like this one:
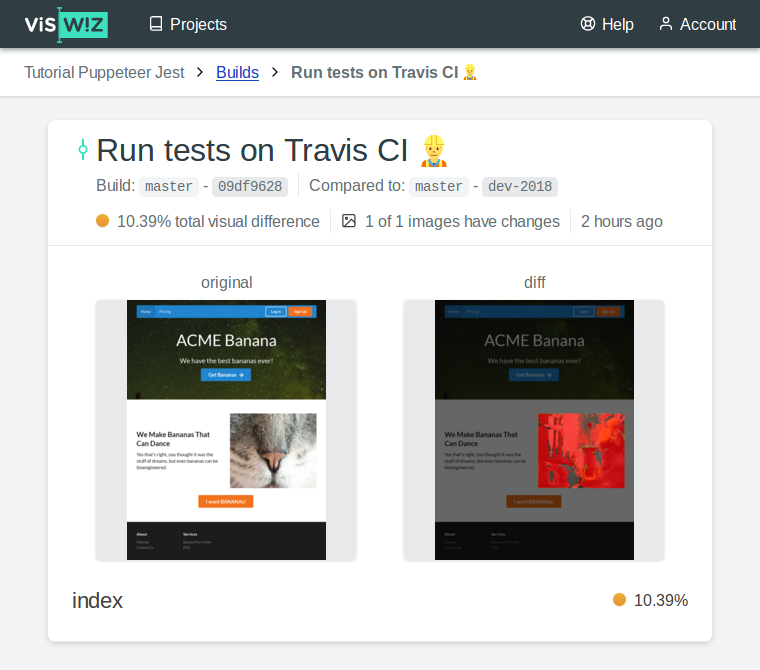
After running the tests, open your Projects page, choose your project and open your last build to see the report for it.
🚀 Final touches
You may notice that by default Puppeteer open the pages in an 800x600 viewport. You can customize the size of the viewport using its setViewport API method. This enables you to test your application in a variety of viewports to validate your app's responsiveness.
You can also follow this tutorial with the actual code, commit by commit, on our tutorial repository: github.com/viswiz-io/viswiz-tutorial-puppeteer-jest.
Congratulations! You are now ready to start visually testing your projects with VisWiz.io! 🎉
📝 Note: This tutorial was first published in the Help section of VisWiz.io.
